Evaluation vs Research (and Sampling)

My project represents evaluation because it is focused on examining what happened within the program while the program was occurring. My intent is to look at the objectives and see which objectives are being met and which activities in the Chromebook initiative are helping reach those objectives and which ones need to be tweaked. What I find will hopefully help improve the program. Thus, my project is evaluation because it lines up with the definition given in the book. My project is NOT research because I am not intending to share what I learn to help implement Chromebooks across a field or share my findings in a professional academic community. Both of these examples would mean I was doing research. But, since this class is an evaluation class, I will not be doing that.

My project uses sampling because I will be creating and administering surveys. However, since my population size is small (around 80 people- two classes of a US Government class that uses Chromebooks) I will probably administer the survey to everyone in the class. There is time and resources available to do this. That way I get the highest precision in my survey.

Blended Learning Project Proposal

EdTech 523 is all about designing and creating internet classrooms. Since I teach in a brick and mortar school I decided to implement parts of an online into my classroom and try out a blended teaching model. For our major class project I decided to make a WWII Blended Learning Unit.

Before commencing on developing my actual unit I had to create a proposal that outlined what I hoped to do by doing this project. This is my Project Proposal. By creating a proposal and developing the blended learning unit I demonstrated that I can create using content and make blended learning environments (2.1 and 3.1).

My main goals for my blended learning unit was to make it so:

  • Students will self monitor their own learning.
  • Students will show mastery and competency of WWII topics.
  • Students will work with primary sources and analyze them.
  • Students will engage with the materials, plan, and create a project of their own choosing.


A Piracy Treasure Hunt

copyright copyThis week for 502 I had to make a scavenger hunt for students on the topic of copyright. I chose to make a Piracy Treasure Hunt. Of course I went all out on it and translated a lot of my text into pirate lingo, included a video of copy right information with pirates in it, and included reward links to pictures of treasure and walking the plank. I had a lot of fun creating something that I thought might be a little bit engaging! Needless to say, I spent way too much time!

From the coding perspective I gained many skills in “experimenting” with design. I have now mastered HTML and CSS to a level where I can try to add new features to my webpage. However, because of my experimentationerrors copy 
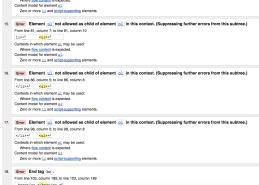
I made many mistakes. For the first time I had errors in my code when I went back to validate it. I had nearly 20 errors (true they were all about the same thing, but still!! 20 errors is a lot!). So I spent over another hour working on fixing my code. It was a lot of work, but now I can say I have good troubleshooting skills.

From the perspective of copyright I now have a much deeper understanding of copyright. I almost wish that I hadn’t had to learn this topic because I no longer can plead a lack of knowledge in my defense. I became much more aware about what resources I can and cannot use. I am afraid I have often broken copyright laws (don’t arrest me, please!). Now I can try to put a better foot forward and teach my students how to use copyright as well.

I like the scavenger hunt activity because I can easily see how you can apply this to a classroom environment. There is so much information on the web that this type of activity can help focus a student on where to look for information instead of just letting them roam free!  planking copy

Web Accessibility Hot Links Page

website copy

The Web Accessibility Simulation Hot Links website I created.

HTML and CSS are no longer scary! I’ve created 4 webpages now and I’m getting the hang of it! This week’s project focused on making a Hot Links Page about Web Accessibility. I found this very easy. I’ve been putting links into my other pages. The new coding elements I learned about was how to link to another area of the text and how to make the link change colors when you click on it. I also learned that you must do certain things to make your webpage accessible to people with disabilities. You can check to see if a webpage is accessible by going to the Web Accessibility Evaluation Tool.

For my web accessibility project I focused on simulations that help students (and educators) know what it would be like to have a certain disability. These simulations are important so that we can gain empathy for our students, classmates, and colleagues. I would definitely recommend you to go and try and experiment with these simulations. In addition, it is important to know that gathering information while having a disability will be exponentially more difficult and time consuming. This is essential for teachers to know as they try to coach their students through the process. I learned about 4 different types of disabilities that need adaptions to make the internet more available. Cognitive Disabilities or Intellectual Disabilities make it hard to concentrate and pull information from the page. Beware of content overload. Visual Disabilities impact vision. It is important to make content that is easily read and easily converted to screen readers. Don’t forget the impact color-blindness can have on a person trying to read a website. Next are Auditory Disabilities. These will affect the hearing. It is especially important to remember to caption videos. Finally, there are Physical Disabilities which will make it hard to use computers. For Physical Disabilities there is adaptive equipment that one can use.

simulation copy 2

Simulation to show how hard it is to process information with cognitive disabilities.

In addition, as we create webpages it is important to make it accessible so all students can use it. Some tips for making accessible webpages are:

  1. Use backgrounds and fonts that contrast.
  2. Include alternative text when you have pictures included.
  3. Always caption videos.
  4. Make your webpage easy to follow using headings.
  5. Use CSS style sheets which make it easier for screen readers to strip a website of formatting so that a reader can just get down to the content.
  6. Test your websites using the WAVE Tool.