Blended Learning Project Proposal

EdTech 523 is all about designing and creating internet classrooms. Since I teach in a brick and mortar school I decided to implement parts of an online into my classroom and try out a blended teaching model. For our major class project I decided to make a WWII Blended Learning Unit.

Before commencing on developing my actual unit I had to create a proposal that outlined what I hoped to do by doing this project. This is my Project Proposal. By creating a proposal and developing the blended learning unit I demonstrated that I can create using content and make blended learning environments (2.1 and 3.1).

My main goals for my blended learning unit was to make it so:

  • Students will self monitor their own learning.
  • Students will show mastery and competency of WWII topics.
  • Students will work with primary sources and analyze them.
  • Students will engage with the materials, plan, and create a project of their own choosing.
 

Freedom Machines Mini Documentary

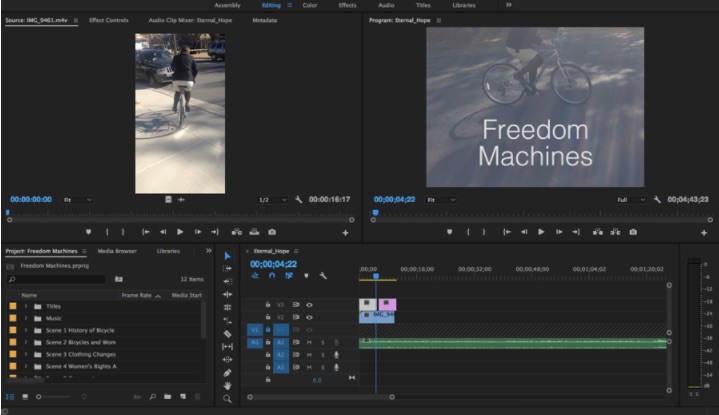
I worked very hard on the mini documentary project for my YouTube for Educators class. I put in many hours and many tears. I like creating documentaries and videos. Through this project I learned about Adobe Premiere. I learned how to add narrations, titles, sound effects, and interweave my photos into a final project. I also spent time closed captioning my documentary.

The mini documentary can fall into many AECT standards. It falls into many aspects of creating and using. For instance, standard 1.2 says that I can use technological resources to support student learning. I have demonstrated that I can use Adobe Premiere by making a documentary. This will in turn help my pedagogy be more engaging and use more primary sources. In turn this will connect my students.

I had troubles exporting my project and uploading it to YouTube. Let us just say, there were some tears. I ran out of memory on my computer while trying to upload it. So then, I tried to save everything in my documents folder to my external hard drive. After I had finish saving everything to my drive I deleted it from my documents folder. Then I tried to find my final project and it was GONE! So, I quickly looked on my hard drive and NOTHING had saved. I was in tears because everything was deleted (I had even cleared my trash to free up room on my computer). I decided to search one more time and discovered that my TimeMachine had automatically backed up everything and had finished just 10 minutes prior to my purge of the system. It was a miracle!! My project was saved and I just had 10 minutes of work to fix it back up. I figured out how to upload it and felt so grateful! From this project I learned to have more empathy for my students when their assignments get deleted or they have technical difficulties. I also learned I need a computer with more memory and to double check before I clear my trash can.

Media Asset Plan

After making my storyboard for my documentary I had to collect images, audio, and videos for my project. I used Library of Congress and Wikimedia extensively. I learned from this assignment great places to look for images from the Creative Commons. It was easy to find images that met copyright because all of my images were from over a hundred years ago. I was surprised to find that YouTube has free Any time I respected copyright I was fulfilling AECT 3.5. I did this with my media asset plan. I learned where I could find certain open source media clips. I was able to look and find ample media to put into my media asset plan so that I could produce a good mini documentary.

Media Asset Plan link

In addition, I was able to try out Adobe Premiere and import all of the image files. I found it very useful to be able to simply import all of my files into the program and keep them in separate folders for each scene.

screenshot-copy

Short Form Educational Video


I created this Short Form Educational Video for EDTECH 533. Students have a short attention span, so it is important to create short videos. Also, most people only watch the start of videos. Thus, it is important to keep information short and to the point. The most important points should come at the start of the video. The purpose of this project was to give us practice using low cost video programs. I chose to use Screencast-O-Matic which is a screen recorder.  This is a very easy program to use. It is also free. I liked how it highlights your cursor. However, it is very limited in what it can do. However, I was able to capture my screen for this project and show directions on how to set sharing preferences on Google. I ran into the problem in my class that I kept having to direct students on how to set their sharing preferences so that I could view their documents (default is private). This video should solve that problem as I can now send this link to anyone who submitted their assignments wrong and quickly solve the problem without using too much of my energy.

I really wanted to go try out some of the other Short Form Educational Video programs. I’ve tried out making videos from PowerPoint before as well. I chose Screencast-O-Matic because it fit my situation best and seemed like a valuable tool to make tutorials in the future. The below are the tools with descriptions written by Dr. Chareen Snelson:

  • YouTube video editor (https://www.youtube.com/editor). Completely free and works through your YouTube account.
  • PowToon (http://www.powtoon.com/edu-home/). Free and low-cost options are available. Make sure to check out the education options for teachers and students. They seem quite reasonable with respect to price.
  • Screencast-O-Matic (http://www.screencast-o-matic.com/). Free version and a low-cost pro option with editing tools available.
  • Stupeflix (https://studio.stupeflix.com/). A free version is available with no need to login, although you can create a free account if you like. An optional pro plan can be obtained for a fee to unlock additional tools. An educational version is also available.

I also, worked on editing closed captioning in this project.

Things I learned about myself while doing this project: I say “so” a lot as a filler word. I need to speak quicker and not have so many pauses. I like video making. I wanted to make a full video for each program.

VLOG with Closed Captioning

This week we learned what a Vlog is. It is pretty self explanatory. It is basically a Video Log (kind of like a blog, but with a video). Vlogs can be useful for teachers and students. First, a teacher can simply record information for a class. Then the class can go in and listen to the information. In addition, teachers can reflect on best teaching practices. By reflecting on teaching practices a teacher can improve their teaching. Teachers could assign students Vlog assignments to gauge how much a student has learned, allow student creativity, and allow student self-reflection.

For this project I focused the content on reasons to use and not use YouTube in education. I believe that YouTube has a lot of to offer in Education. The top reasons to use YouTube are it allows for supplementary material to be delivered any time, it creates engagement, and can allow for student creativity. The top reasons not to use YouTube are that a teacher can rely on YouTube too much, content can sometimes be inappropriate, and content might not be curated for reliability.

I also learned about closed captioning by doing this project. Closed captioning is super easy to do on YouTube. It actually does it automatically and then you just go in and place your edits. I couldn’t figure this feature out at first, so I just uploaded my script. I think that Closed Captioning is important in videos because I think you should always show closed captions as you view videos even if you don’t have someone with auditory disabilities. By playing videos with closed caption a student can read along. This might help certain learning groups (reading/writing learners).

WebQuest

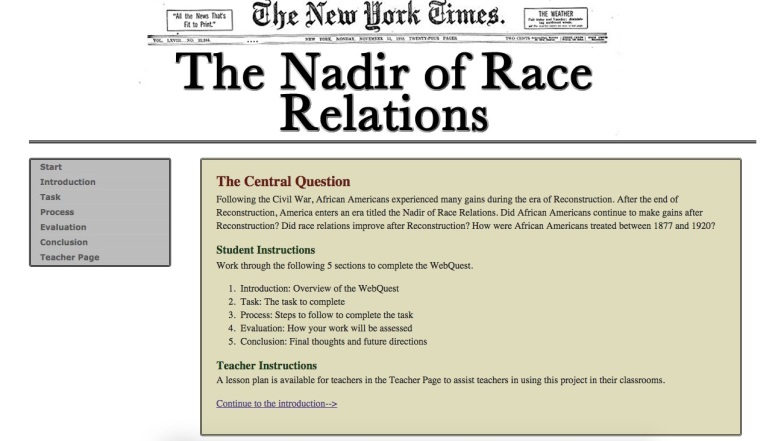
The final project in EdTech 502 was to create a WebQuest. A WebQuest is an educational strategy that allows a teacher to guide students to a higher order thinking activity by using a formulaic process (see the picture below to see the 5 steps to this process) and guided research.

For my WebQuest I created a multipage website which guides students through the Nadir of Race Relations. This is the time after the Civil War and Reconstruction into the 1920s. I wanted students to understand that not everything gets better for African Americans following the Civil War. I had students do this activity and their products turned out pretty good! They created newspapers reporting on their findings using the website Newspaper Club. I actually created this assignment to benefit my classes and I think it went fairly well. I did allow students to use Google Doc Newspaper Templates to do this assignment as some of the students could not figure out the internet software. An example of a successful product can be found here.

As I conclude 502, I feel that my confidence in working with website design and coding has greatly grown. I also feel confident that I can create web programs for students that will have added educational value.

Nadir copy

Virtual Tour: Asian Regions

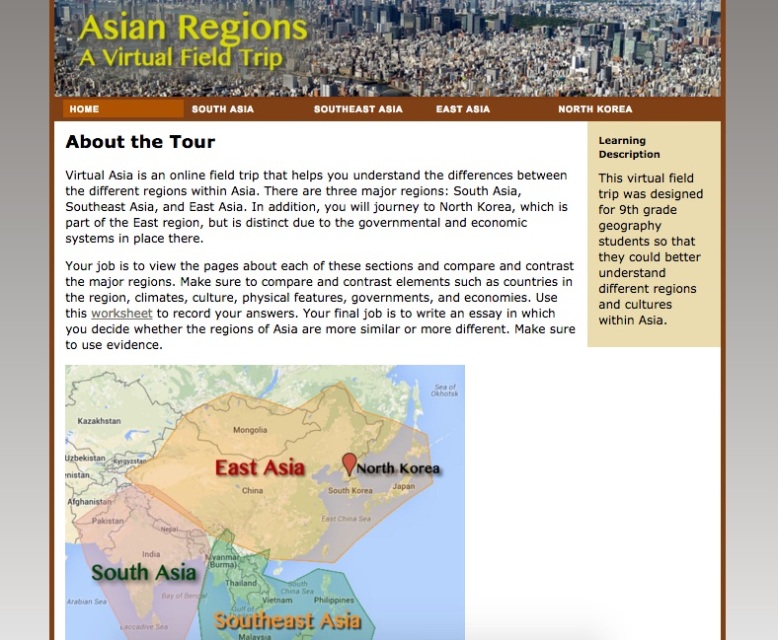
Last week I was instructed to create a Virtual Tour for my 502 class. A Virtual Tour is a learning strategy in which you can help show students different areas of the world (or museums or timelines) using internet activities.

For my V-Tour I constructed a webpage about Asian Regions. The point of the website is to have students learn about the different regions in a way that allows them to explore the internet. This allows students to be more engaged in the learning process, but it also allows me to tailor the material and provides a way that I can ensure every student has access to the same high quality materials.

Creating this webpage was a lot of fun because I was able to blend together several techniques I had previously learned in the class. It is great because I am building on my prior knowledge that I have gathered! I included banner images, background gradients, a concept map with navigation links, plus, I am just able to construct websites! I am learning how to make quality webpages that pass validation and are well designed and laid out.

I can see myself using V-Tours in my class in the future in order to help students visualize different information. For instance, they could be super helpful as I teach a Geography class. I could have students explore certain parts of the world to understand geographical features and cultures. In my US History class I could have students also explore locations or I could construct a timeline V-Tour where students could process information that way!

Asia Picture copy

M-Learning Activity

mlearning copyM-Learning stands for mobile learning. This type of activity utilizes the fact that a lot of our students use cell phones. It enables students to learn where ever they are. This type of activity has a lot of potential as cell phones are getting more and more powerful and prevalent and as learning outside of the classroom is more appealing.

In 502 we were instructed to create a M-Learning activity for our students. I chose to make a M-Learning activity where students would leave the classroom, roam the school and discover the Five Themes of Geography for themselves. I liked this activity because it asked them to apply the material we learned during class and find unique situations that related to the Five Themes of Geography. This means that my students could then have a more personal and interactive way to learn the material. Therefore, they might be able to grasp the concepts better and remember the information longer.

For this project we used fluid design layouts on Dreamweaver. This is an important feature because it allows for the webpage to be responsive to screen size. For instance, you can view the webpage on a regular monitor, a tablet, or a small smart phone screen and see all the pertinent information. The webpage will change size depending on screen size.

This was actually my worst artifact for the 502 class so far. I struggled getting the page to look nice and some of the video links wouldn’t resize properly. In the end I decided to celebrate my birthday (or birthday-week) instead of stressing too much about perfection! My grade in 501 suffered this week too… Oh well, I’m another year older and wiser and now I know about M-Learning and Annotated Bibliographies (see my 501 post from tomorrow…wow, this post is from the future!).

Jigsaw Activities

Civil War copyI really like designing. I like being forced to go make a new lesson plan for my class. When I am doing my assignments I always try to think how can I use this assignment to be helpful in my class. Then, I do my best work because I know I will actually try to use it in my class one day.
For instance, this week in 502 I was supposed to create a Jigsaw activity. Jigsaw.org has some very clear instructions about what a Jigsaw activity entails. Basically, it is supposed to divide a large amount of materials into 3-6 groups in which a student will become the expert on that material. Then, the student will teach people who read different materials the information. This way a lot of material is covered and a student understands at least one section really well. I’ve always known about Jigsaw activities and I have used them to varying degrees of success. Some of my fellow teachers really hate them because they feel that some students don’t do their part and that no one ends up learning anything. I do think you have to be careful in that you make sure people in the same expert groups get time to review the material together and make group conclusions so that they all understand. Whenever I use Jigsaws in my class I try to make sure that the students know that they are expected to be the expert on the material and that the other students need them.

For this activity I created a Life During the Civil War Jigsaw Activity. The purpose was to allow students to learn about daily life and how the war impacted various groups of people. It was a lot of background work trying to find secondary and primary sources that were at level with what I needed my students to read to understand the topic. I also included questions to help focus their reading so that they could be sure to share important concepts with their groups.

I can foresee myself using charts and jigsaws in my classes often. I have a lot of material to cover and I want my students to teach the material and really own that material. A chart is useful in collecting primary sources and videos and really making sure that the information given to students is reliable.

Concept Map

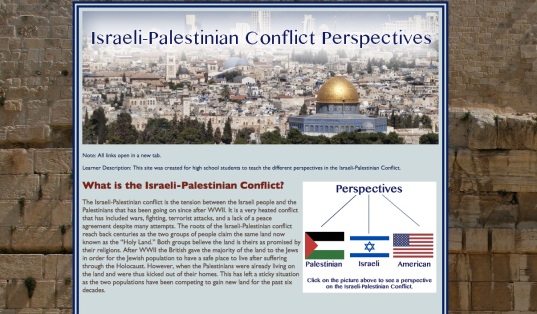
It is awesome to look through my 502 webpages and see how much progress I have made! I really have learned something (reports Katie to her learning log). I am fairly confident in the use of HTML and CSS.

This week I learned how to add pictures, gradients, and concept maps to a webpage. In addition, I experimented with Fireworks for the first time and mastered some basic skills. Now I actually know what that program does and can do! I made a concept map using Fireworks and Dreamweaver. View my concept map and webpage created about the Israeli-Palestinian Conflict here.

Concept maps could be very useful in a class to help illustrate a principle discussed in class. In my example I linked the pictures to videos and articles to further explain the concepts. This could be a beneficial way of helping students delve deeper and give students reliable material that is related to the content. I made my page about the perspectives of the Israeli-Palestinian conflict, but I could have easily made it into a timeline of events, comparisons of two sides/events/places/people, or a flow chart of information. The possibilities are limitless!

Israeli Conflicts copy